前言
在上篇中介绍了SpringCloud Config的完美使用版本,本篇则介绍基于SpringCloud(基于SpringBoot2.x,.SpringCloud Finchley版)中的路由网关(SpringCloud Zuul)的使用教程。
SpringCloud Zuul
介绍
Spring Cloud Zuul 主要的功能是提供负载均衡、反向代理、权限认证、动态路由、监控、弹性、安全等的边缘服务。其主要作用是为微服务架构提供了前门保护的作用,同时将权限控制这些较重的非业务逻辑内容迁移到服务路由层面,使得服务集群主体能够具备更高的可复用性和可测试性。
通俗一点来说,就是对服务提供一层保护,对外界的请求进行过滤转发到后端服务中。
这里我们可以通过几张简单的示例图来进行了解.。
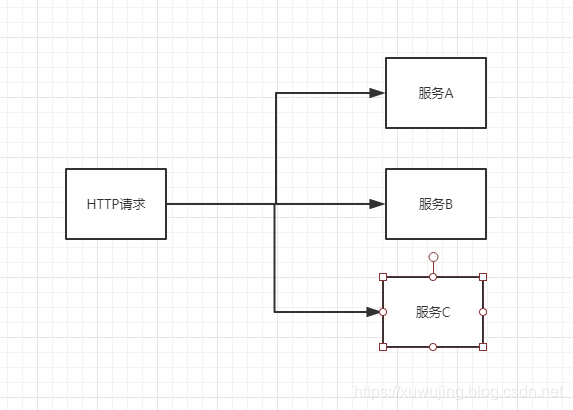
不使用路由网关的示例图:

使用路由网关的示例图:

使用路由网关并且加上注册中心的示例图:

从上述的示例图中,我们发现加了路由网关之后,实际上是将一对多的关系转变成了一对一的关系,这样的好处是我们可以在网关层进行数据合法校验、权限认证、负载均衡等统一处理,这样可以在很大的程度上节省的人力和物力,但是这种方式也有一定的弊端,就是以后新增了服务或者在服务中新增方法,就会使得网关层可能需要进行改动。幸好在Spring Cloud 有 Zuul 这样一个组件,通过eureka将网关和微服务之间相互关联起来,都会在eureka上进行注册,这样Zuul就能感知到哪些服务在线,并且可以通过配置路由规则将请求自动转发到指定的后端微服务上,这样即使后续新增了服务或者在服务中新增了某些方法,那么只需在Zuul层进行简单配置即可。
开发准备
开发环境
- JDK:1.8
- SpringBoot:2.0.6.RELEASE
- SpringCloud:Finchley.SR2
注:不一定非要用上述的版本,可以根据情况进行相应的调整。需要注意的是SpringBoot2.x以后,jdk的版本必须是1.8以上!
服务端
由于我们这里是使用的第三种模式,所以需要使用到Eureka注册中心,因此这里我们也顺便弄一个注册中心服务。
注册中心这块配置和代码和之前springcloud-config配置基本一样即可。注册中心新项目的的名称为springcloud-zuul-eureka。
注册中心pom配置、application.properties配置和代码如下:
pom:
<dependencies>
     <dependency>
       <groupId>org.springframework.cloud</groupId>
       <artifactId>spring-cloud-starter-netflix-eureka-server</artifactId>
   </dependency>
application.properties:
spring.application.name=springcloud-zuul-eureka
server.port=8006
eureka.client.register-with-eureka=false
eureka.client.fetch-registry=false
eureka.client.serviceUrl.defaultZone=http://localhost:${server.port}/eureka/
代码:
|
|
注册中心服务配置完成之后,我们在新增一个Zuul服务,该服务的 pom配置、application.properties配置和代码如下:
pom:
<dependencies>
    <dependency>
        <groupId>org.springframework.cloud</groupId>
        <artifactId>spring-cloud-starter</artifactId>
    </dependency>
    <dependency>
        <groupId>org.springframework.cloud</groupId>
        <artifactId>spring-cloud-starter-netflix-eureka-client</artifactId>
    </dependency>
    <dependency>
        <groupId>org.springframework.cloud</groupId>
        <artifactId>spring-cloud-starter-netflix-zuul</artifactId>
    </dependency>
</dependencies>
application.properties:
spring.application.name=springcloud-zuul-gateway
server.port = 9009
eureka.client.serviceUrl.defaultZone=http://localhost:8006/eureka/

zuul.routes.hello.path = /hello/**
zuul.routes.hello.url = http://localhost:9010/hello
zuul.routes.hi.path = /hi/**
zuul.routes.hi.url = http://localhost:9011/hi
代码:
|
|
客户端
客户端这边在之前springcloud-config-client项目中进行改造,新项目的的名称为springcloud-config-bus-client,在pom文件中新增如下配置:
<dependency>
      <groupId>org.springframework.boot</groupId>
      <artifactId>spring-boot-starter-actuator</artifactId>
  </dependency>
spring-boot-starter-actuator表示对该程序进行监控,可以通过http接口得到该程序的各种信息,详细的使用可以查看我的这个项目springboot-actuator,可以在注释中查询各种接口的使用。
然后再到配置文件application.properties中添加如下配置:
management.endpoints.web.exposure.include=refresh
该配置表示暴露刷新的地址为refresh。
注:如果是SpringBoot1.x的版本,那么配置改成management.security.enabled=false即可。
最后在客户端的Controller增加一个@RefreshScope注解,该注解表示在接到SpringCloud配置中心配置刷新的时候,自动将新的配置更新到该类对应的字段中。
|
|
测试
完成上述的代码开发后,我们来进行测试Spring-Config是否可以进行配置实时更新。
首先依次启动springcloud-config-bus-eureka、springcloud-config-bus-server和springcloud-config-bus-client这三个项目。其中9005是服务端springcloud-config-bus-server的端口,9006是第一个客户端springcloud-config-bus-client的端口。
启动成功之后,在浏览器输入:
界面返回:
pancm,hello world!!
输入:
界面返回:
pancm,hi!
输入:
界面返回:
pancm,Hello World!
输入:
界面返回:
pancm,hi!
示例图:


其他
项目地址
基于SpringBoot2.x、SpringCloud的Finchley版本开发的地址:https://github.com/xuwujing/springcloud-study
如果感觉项目不错,希望能给个star,谢谢!
音乐推荐
原创不易,如果感觉不错,希望留言推荐!您的支持是我写作的最大动力!
版权声明:
作者:虚无境
博客园出处:http://www.cnblogs.com/xuwujing
CSDN出处:http://blog.csdn.net/qazwsxpcm
个人博客出处:http://www.panchengming.com